Compared to printing your own black & white or even worse, colour film in a dark room, developing your film at home, both B&W and Colour, is a walk in the park. And the best part is that you don’t need a light-tight room, just a light-tight bag and tank. Yes, there has been many blogs and how-to’s written on this topic, but I thought I should throw my hat in the ring with my views on the subject of home developing. Before we begin, home development is both satisfying and frustrating. It’s incredibly easy to mess up, ruin a roll, waste money, and possibly kill yourself. (I’m only partially kidding about that last one). And you may find that developing your film isn’t for you, and that’s okay, there are still several labs around that can quickly process the common film types.
The Basics – The Essential Equipment
Thankfully the equipment needed to process film is universal. Once you have the basics, you can start processing your black and white and colour films without difficulty. Also, despite what some people may ask, you don’t need a darkroom to process any film unless you’re into tray development or hangers and tanks. These days you can process even your sheet film in light-tight containers. Of course, there are a few additional pieces needed to get the job done.
Change Bag
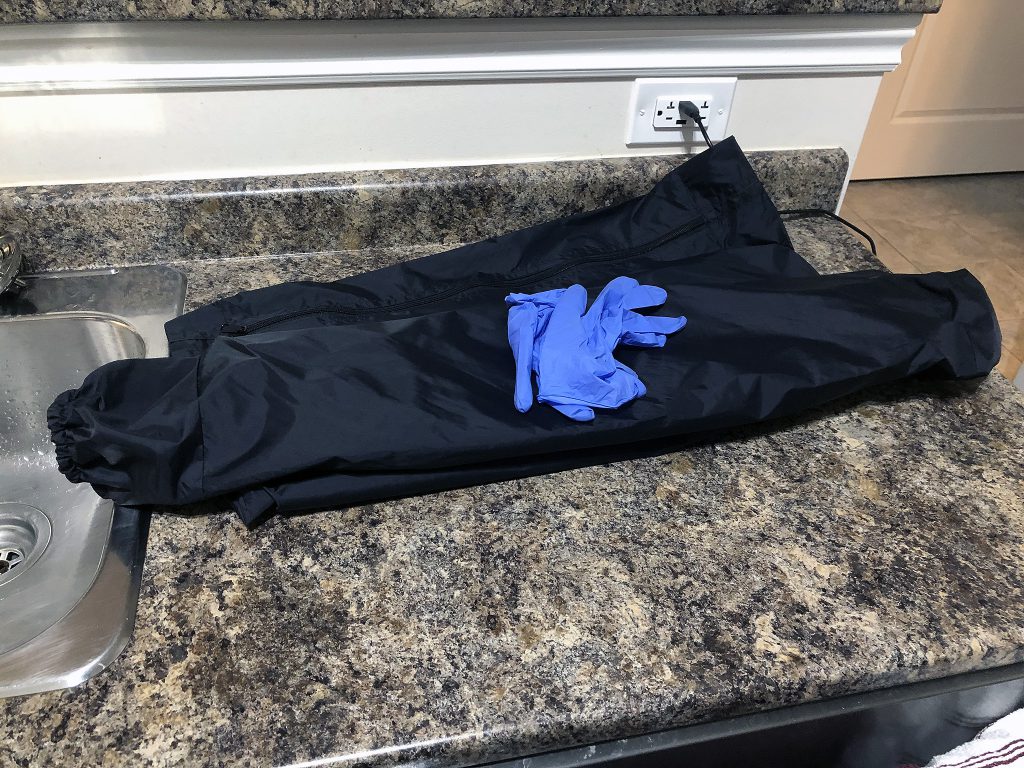
No this isn’t something that allows you to change your clothes in public, a change bag or dark bag is for the average home developer a must-have as it will allow you to load your exposed films onto reels and into a daylight tank in total darkness. It is, put a t-shirt, but without a head-hole and the bottom has a double zipper. The armholes are elasticised to allow for a tight fit and keeping everything light-tight. What the dark bag does is allows you to have a personal darkroom in any conditions, but make sure to keep an eye on the condition of your bag, they will eventually deteriorate and could fog your film. You can also get them in several different sizes, best to look at the dimensions and see what works for you and what you plan on doing. I stick to the medium and large sizes because my bag also is used to load up the 4×5 sheet holders.
Daylight Tanks
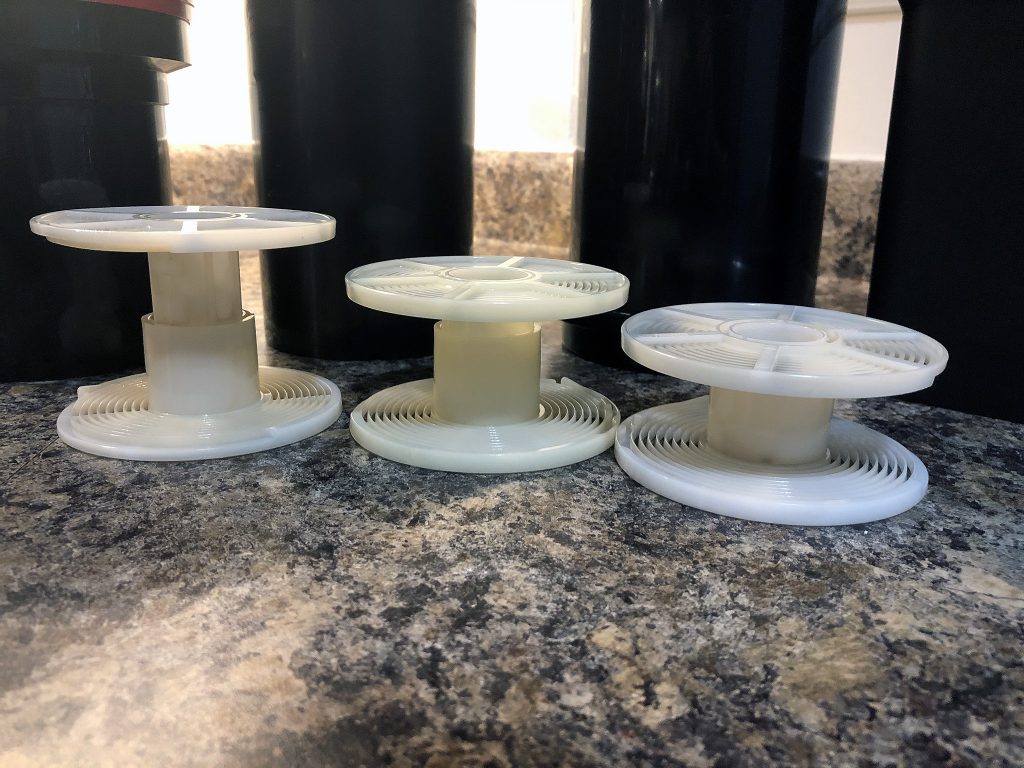
Second to the bag in keeping light away from the film is your daylight tank. Like everything surrounding film photography, your choice in tanks is personal. There are three main types of tanks out there. The first is the Paterson system, my choice in reels and tanks. These are plastic and are among the more popular for most home development. They also come in various sizes that hold a certain number of rolls of certain sizes. The best place to start is the tanks that hold two 35mm reels. Paterson tanks are matched with Paterson plastic reels. These are the items you actually roll your film onto and then pit on a central rod. You load the film using a combination of pushing the film onto the reel and then ratching it into place. The reels can but adjusted to hold 35mm, 127, and 120 films. The one downside is that if you are processing multiple rolls in a single session, you will need a large number of reels as they need to be perfectly bone dry to load the film on without trouble.
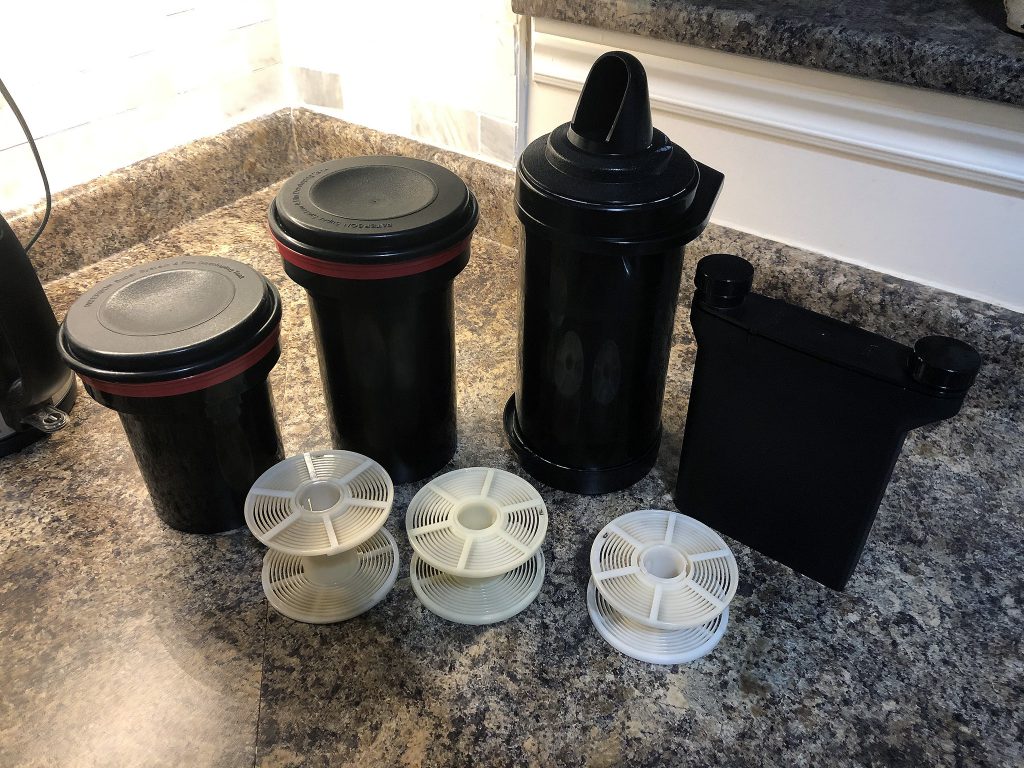
The second type of tank is stainless steel, and like the Paterson system, there are tonnes of photographers who swear by stainless steel. While heavier and slightly more expensive, they work just as well and are light-tight like the Patersons. Unlike Paterson reels, the stainless steel ones are loaded from the inside out by clipping the film onto the centre and then manually setting the edges into grooves on the reel. It is a far more manual process. Know that not all stainless steel reels are created equal, and the best ones to go for are the Hewes brand. You can load your film onto the reels in any condition wet or dry. The downside is that the reels are fixed in size, so you’ll need ones for each size of the film you shoot. Of course, if you’re not a fan of trying to load film onto reels there is an easier option, the Agfa Rondinax or Ars-Imago LabBox which allows you to load the reels without need for a change bag and acts as a developing tank. Now I have little experience with these two devices so I cannot speak on their operation or results.
The third option is the Jobo system; these are some of the best out there but also the most costly and use the most amount of chemistry depending on how you use them. They are also designed to be used with a semi-automatic processor unit and are great for large volume processing and can do any format out there from 35mm up to 8×10. Again you can get different sized tanks and reel units depending on the amount and size of film that you’re processing. But these all come at a price and are not readily available. The only real source in North America is through CatLABS. Of course, there are far more choices out there beyond the three systems I mentioned above. There are other third-party plastic options out there from other manufacturers. I talked about Patterson mainly because I see them as the best among the plastic systems, and they come in various sizes to match any number of rolls in a single tank. And if you have the three 35mm kits, you can purchase a device called a MOD 54 that allows you to process 4×5 sheets in your Patterson tank. But for the most part, when it comes to processing my 4×5 film, I use one of two options. The first is the SP-445 which works just like a Paterson system and allows me to process four sheets at a time. The second method for a certain specialised film and developer combination is a Cibachrome print tank and a rotating base.
Measuring Devices
When it comes to developing film, three things need to be measured. Liquid, temperature and time. Measuring liquid is easy, the best things to get are graduated cylinders, and you probably remember these from high school chemistry, or if your job is in a lab you’re probably surrounded by them all day. Again, Paterson produces an excellent product in various sizes. You’ll want several in different sizes. My main three cylinders are 1L each and marked for the developer, stop, and fix. I keep a fourth one dedicated to mixing up chemistry (I do a few homebrew developers). I also have a 600mL cylinder for the archival wash, a small 300mL cylinder, and two 45mL cylinders one to measure my one-shot liquid developers (Rodinal and HC-110) and one to measure photo-flo. You don’t have to get Paterson; any cylinder will do even a lab supply source can get you everything you need. I would not recommend using anything that is part of your kitchen for cooking or baking.

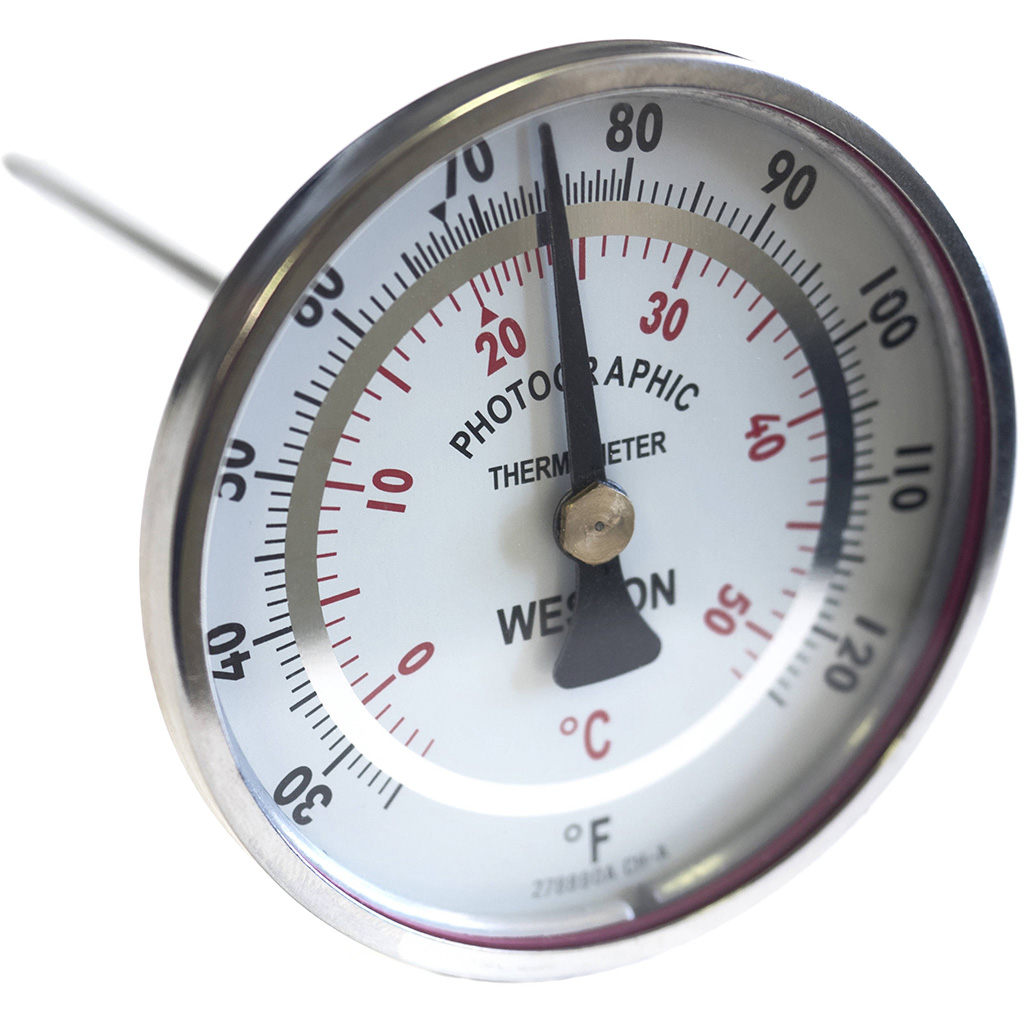
Temperature is equally important, especially if you’re getting into colour developing at home. In this case, you will want to spend a little bit extra and get one designed for photography. This tool is handy because when mixing stock solutions for D-76, Fixer, and Hypoclear. In many cases, you’re working at high temperatures around the 52°C/125°F which makes dissolving the powder far easier. When it comes to black and white, you’re working closer to 20°C/68°F and have about a +/- 1° range of latitude for best results. You need to be closer to 0.5° when it comes to colour. You can go with a traditional mercury-based thermometer, a dial-based thermometer or a digital-based one, it all comes down to home much you want to spend. But honestly buy a new one and occasionally test it to make sure it’s still accurate.
The third and final thing you need to measure is time. Each film/developer combination has a specific time to be in the developer. Also following the agitation pattern. And here you can go as simple as using the Massive Dev chart and using the timer function on your smartphone or going even more old school and using a stopwatch. I’ll discuss this later in this article. Another option is using a film developing app for your smartphone. In these cases, the apps also contain a database of popular films and their associated times programmed. It also gives the option to customise the times to your preference and even add in your own. Some of the applications out there include Develop!, Film Developer Pro, and my personal choice The Massive Dev Chart. Some are free others are costly, but honestly having used the MDC app since I started, and it makes life easy because it not only helps with having all the times you need but also timing your agitations.
Storage
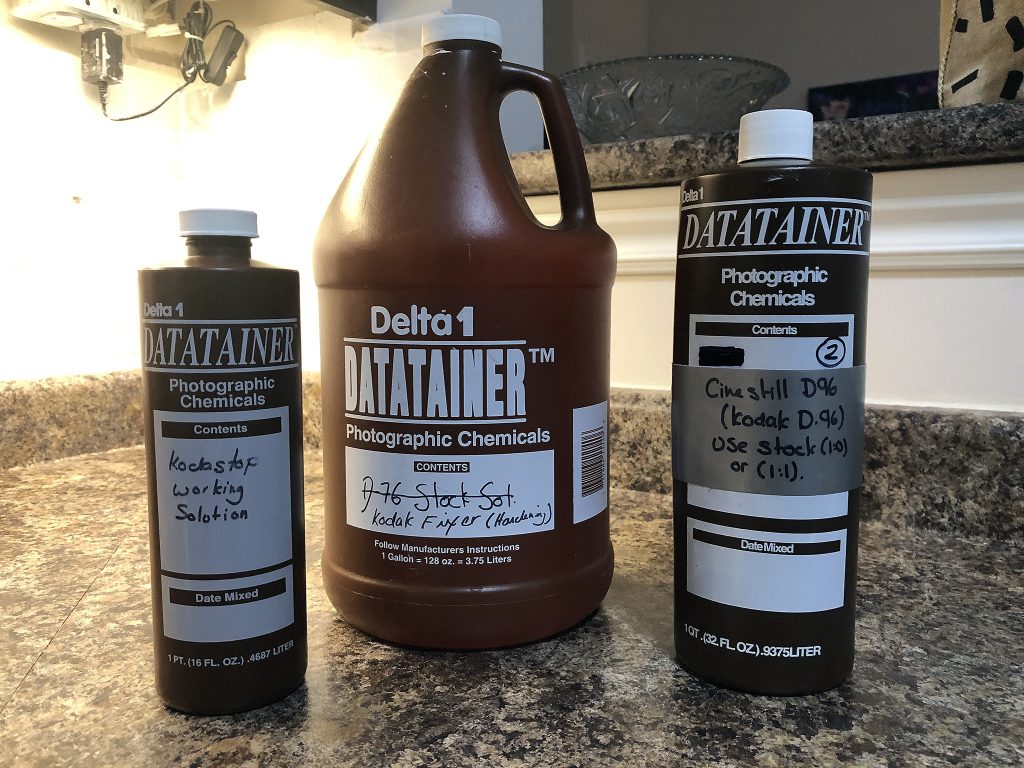
The final piece of equipment you need is storage, not only for all the bits and pieces but also the chemistry. When it comes to chemistry, the best place to store them is, in the case of liquids, the best place to store them is in the bottles them come in. But in the case of chemicals, you have to mix from powder or concentrate you’ll need something to store them in. For me, the bottle of choice is plastic, specifically the Delta 1 Datatainer. I keep a bunch of 3.8 litres (1 US Gallon), 1 litre, and 500-millilitre containers. Each is dedicated to a single chemical type as to prevent any cross-contamination. And the best part is that there are areas on the bottles to write on, so you know what chemical is in what bottle. And it’s important to check, as all the containers of the same type tend to look alike. I once tried to ‘fix’ a roll of film in a developer. One of the many mistakes that can be made. If you’re running on a budget, you can always reuse or repurpose containers. One of the popular options is the 1-litre pop bottles make sure to wash them with soap and rinse thoroughly and allow to air dry before making use of them. If you’re feeling a little more old school, there’s always the amber glass bottle method. If you need to store larger volumes of chemistry, a red plastic gas container is a good choice. I kept one around when I was working a lot with Kodak Xtol, which you mixed to a five-litre stock solution.
In hindsight, it would have been better to store it in five one-litre containers. No matter what choice you pick, it’s essential to make sure they all have lids that fit and can be made moderately airtight. You can always use a bit of that compressed air to chase out any oxygen leftover in the bottle. When it comes to storing everything I use a pair of Tupperware bins, one for all the equipment and a second for all the chemicals that I use. Now I’m in a position where I don’t have to worry about small children finding their way into my chemistry, so everything gets stored in the condo’s broom closet. The bigger 3.8L bottles are stored on the floor, while everything else is up on a shelf. I’d be remiss if I didn’t mention that if you do have small children or pets, it is deadly important to keep any chemistry out of their reach. While some are more toxic than others, it’s a good rule not to drink any of the chemistry as it could put the drinker in danger of death. I also make a point to clean the areas I work on with hot water and proper cleaner after each developing session.
Chemicals – The Black & White Edition
When it comes to developing black and white, there are at minimum two chemicals that you need, a developer and a fixer. That said, most will say there are three chemicals, developer, stop bath, and fixer. But you can go even higher and bring that number to five, developer, stop bath, fixer, archival wash, and rinse aid. For the sake of completeness, we’ll be focusing on a five(ish) chemical kit so that you get the best possible results from your black and white films.
Developers
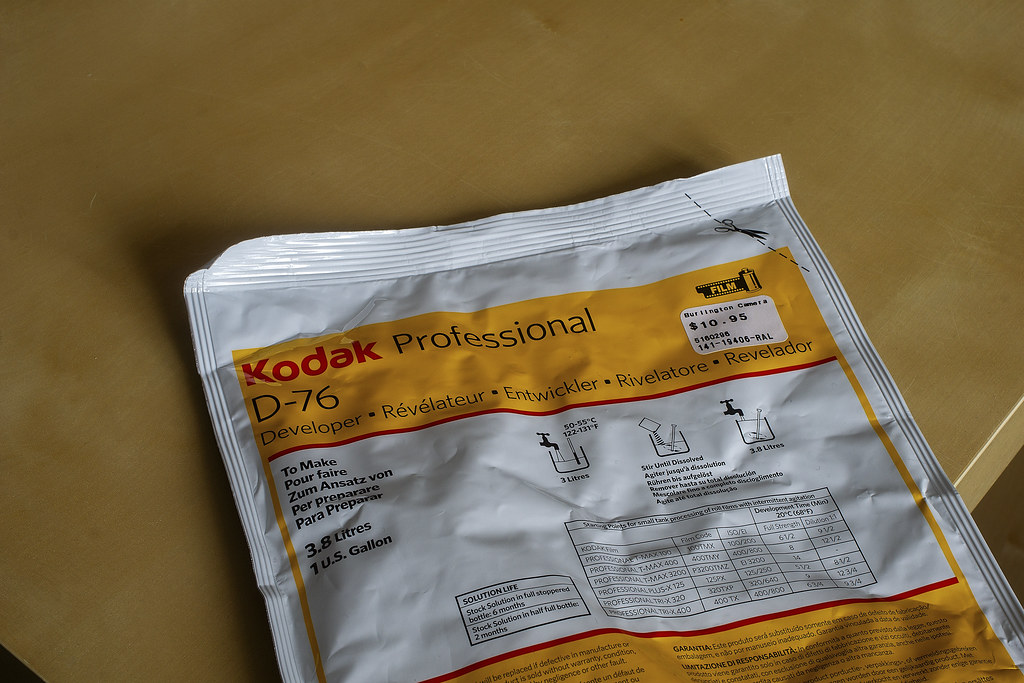
At a basic level, the developer is a reducer; it reduces the silver halide suspended in the gelatine on the film base, into actual silver crystals. When it comes to developers you have a lot of options available to you these days, and the more you develop films, the more you’ll start to find ones that you like and developers that work well for all films and others that are more specialised. If you’re getting (back) into home black & white developing, then three developers are good ones to start home development. The first is Kodak D-76, D-76 is a general-purpose jack of all trades developer. D-76 is mixed from powder into a stock solution, and a package from Kodak will mix up 3.8 Litres of stock solution (1 US Gallon). You can then use either the stock solution (with the ability to reuse it for a specified number of rolls) or dilute it with water into a one-shop solution. For the most part, people will dilute D-76 to either 1+1 (one part developer, one part water) or 1+2 (one part developer, two parts water). The more you dilute the developer, the longer your developing time will be. D-76 is a good place to start as it gives a baseline, you can shoot the film at box speed, and D-76 will let the film qualities shine through, it doesn’t add or subtract sharpness, grain, or contrast. It’s a great place to start and economical.
The second developer is Kodak HC-110; this is a liquid developer that you dilute with water to make a working solution. The original HC-110 is a thick yellow syrup, Kodak recently tweaked the formula making it easier to pour and uses the same dilutions as the OG stuff and gives the same results. Not sure of the longevity of the new formula. If you’re a little confused about the different dilutions for HC-110, don’t worry. Kodak uses an Alphabet system, but each dilution has a numerical value as well. The most common dilution for a beginner is Dilution B or a 1+31 dilution. Dilution B is an excellent catch-all dilution and gives excellent results, but if you find it produces too much contrast, the more you dilute the developer, the lower your difference will be. I’ve started using an un-official dilution, H, which is 1+63 and just doubling the development time. HC-110 is a great developer if you want to enhance the contrast or have the ability to control the contrast of a film. It also works well for developing old expired film as it contains an anti-fog agent.

The third developer that is a good one to start with is Rodinal. Rodinal is the oldest still-produced commercial developer. First introduced in 1898 by Agfa, but today is known by many different names such as Adonal, Blazinal, and R09 One-Shot. Rodinal is another liquid developer that you dilute to a working solution the two most common are 1+25 and 1+50. If you want to enhance your film’s sharpness, then Rodinal is the developer you want to use. But there is a payoff; if your film is grainy, then the grain will be enhanced in the final results. But don’t let that stop you, I’ve shot plenty of fast movies and gotten amazing results. Additionally, Rodinal can be diluted even further to 1+100 and 1+200 and used to stand or semi-stand develop your film. That is letting the film sit in the developer for 1 hour or more with very little in the way of agitation and is almost a magic bullet to figure out what a mystery film is or tame everything about the film that has bothered you in the past.

Of course, there are tonnes more developers out there to explore but leave that until you get the hang of things with these easy ones. Other good developers out there are Kodak XTOL, Kodak TMax Developer, Cinestill Df96 Monobath, FA-1027, Cinestill D96, Pyrocat-HD and so much more!
Stop Baths
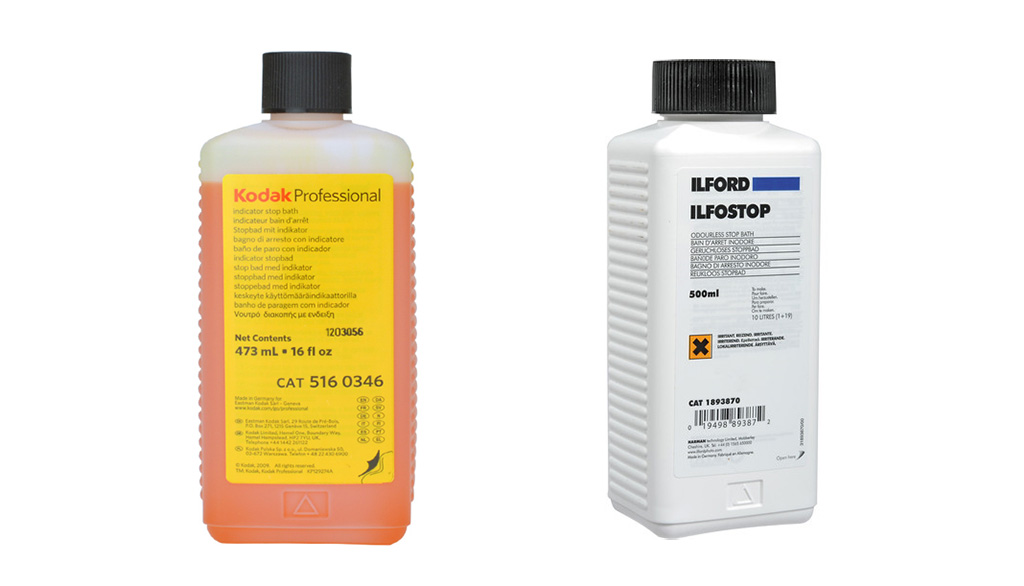
Once you’ve got the film developed, you need to stop the developing action before it overdevelops the film. This is where you stop bath comes into play. As the name implies, this stops development through one of two methods. The first is a shock method; this is done through a chemical stop bath that neutralises the developer which operates in a base environment by introducing a dilute acid. Both Kodak and Ilford produce a chemical stop bath that you dilute with water to create a working solution, don’t pour the concentrate directly on the film, or you will damage the emulsion. What’s nice about these stop baths is that your working solution will last for several rolls of film so you can reuse the solution. There’s also a special chemical marker in them that once the working solution is exhausted, it’ll lose the bright orange colour and will eventually turn purple. The second option for stopping the development is to dilute the developer by using straight water. Now there are plenty of polarising opinions on this matter. Some are strong advocates of a chemical stop while others want to reduce the number of chemicals being used on their film. For me, I usually decide based on the developer and how I developed the film. If I’m using a strong developer and/or a short development (10 minutes or shorter) time, I’ll go with a chemical stop bath. If I’m using a dilute developer and/or a long development time (10 minutes or longer), I’ll go with water. I also read best practices for each developer; for example, I always use water when working with Pyrocat-HD because the creator of the developer advises that you don’t use a chemical stop. Also if I’m stand-developing film, I’ll use water to stop because of the extreme length and dilution.
Fixers
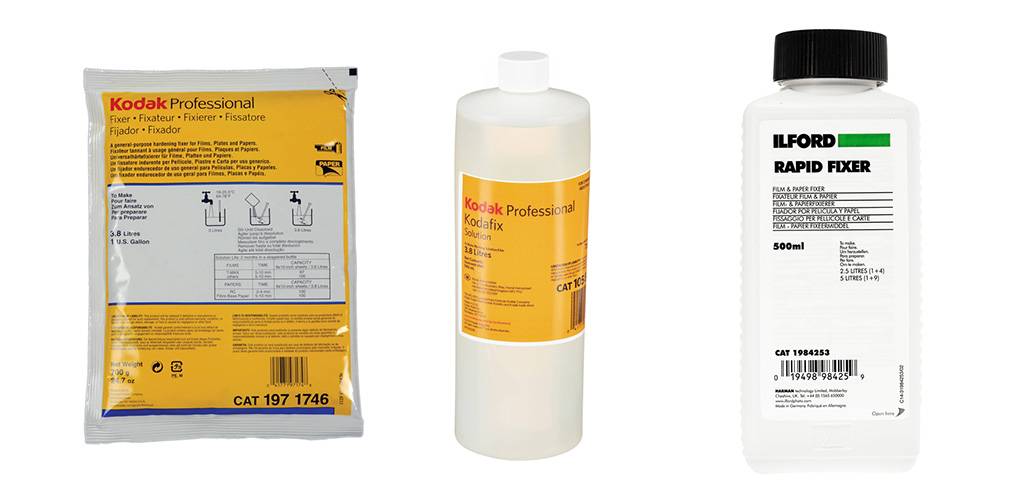
Fixing the film is the final step in the development process. Once you’ve fixed your film, it is no longer light sensitive and can be exposed to light without danger of losing the roll. Next to developing this is the most important step. In chemical terms, the fixer will set the image by washing away any unreduced silver halide leaving only the actual silver crystals. Today most fixers that you’ll use in home development are known as rapid fixers. Both Kodak and Ilford produce an excellent product. Ilford Rapid fixer you mix from a liquid concentrate with water to make your working solution. When mixed at 1+4, the solution can be reused for several rolls of film. Kodak Rapid fixer is mixed from either a liquid or powder into a working solution similar to D-76 they make 3.8L (1 US Gallon) and last for a specified number of films. Of course, how long your fixer lasts depends on the type of film you’re using, cubic grain films (Tri-X, HP5+, FP4+) are not hard on fixers, but modern T-Grain/Delta films (Kodak TMax, Acros, Ilford Delta) are a little harder and reduce the number of times a fixer can be reused. If you do a lot of developing and often have long periods of inactivity you might want to invest in a product called Hypocheck. It will let you know if the fixer is still good.
Ancillery Chemicals
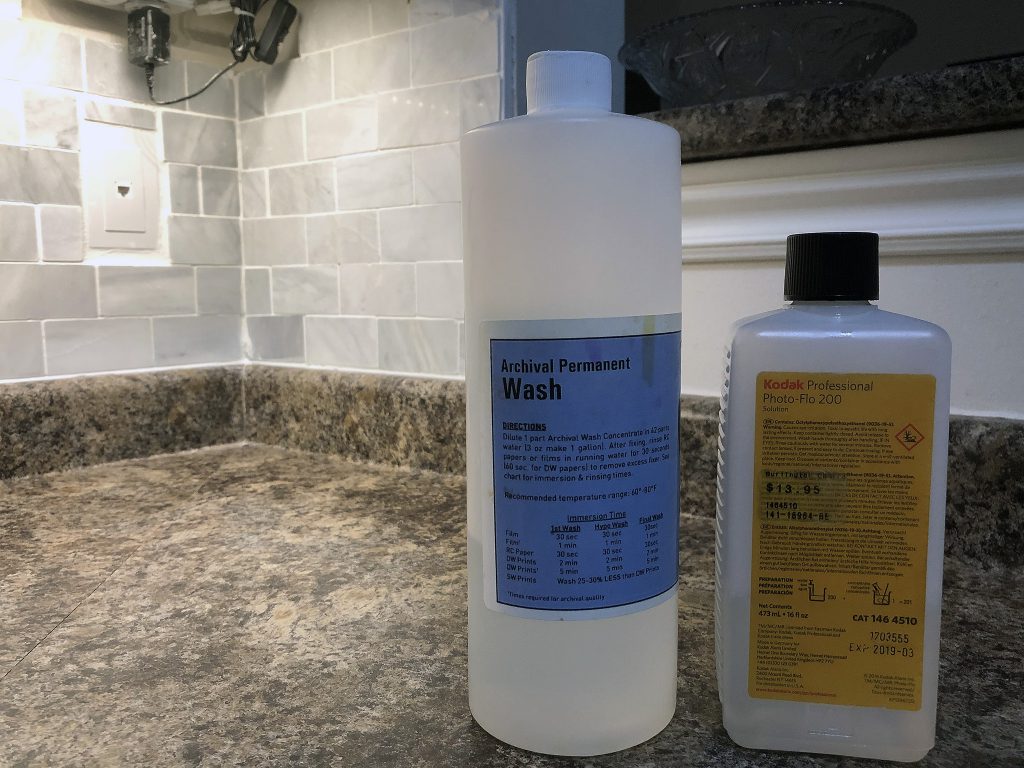
The following two chemicals are not needed for the basic process. Still, they certainly help in maintaining the stability of your negatives and generally make your life easier and reduce the amount of water you need each developing cycle. The first of these is an archival wash. Such a chemical will dilute the fixer, which will make the wash times less. One of the most known is Kodak Hypoclear. Hypoclear comes in powder form and mixed to produce 3.8L (1 US Gallon) of stock solution. You then dilute it 1+4 for a working solution. After the fix you let the film stand in the solution for two minutes, then complete your final wash. Another option is Edwal Permawash, sold today as Heico Perma Wash. Ilford Universal Wash Aid or the FPP Archival Permanent Wash, you let the film stand under running water for a minute after fixing, then stand in Archival Wash for a minute, then another minute under running water. I usually do a final wash for two minutes. These chemicals give you a final wash time of around 4.5 minutes, compared to over 10 minutes. The second chemical is a rinse aid. This chemical is a specialised detergent that helps the negatives dry clean and streak-free. Now I highly warn against using your standard dish liquid like Dawn or Sunlight. Instead, a product like Kodak Photo-Flo 200 is your best bet. Add 1 mL to a full tank and give it five agitations.
The Process – Actually getting your film developed
Okay, now you’re ready to get going on developing your film. While the process to develop black & white and colour are similar, for the sake of this articles I’ll be covering the black & white process only. The reason is that it’s the process I know the best and have been practising for almost eight years now in a continuous period. These days I develop black & white film at least once a week. The first thing you should do is lay everything out that you need, your change bag, cloves, all the chemicals, timer, and cylinders. Keep your workspace organised, and get out only anything you need. I often will write out the film that is going to be processed, and how I’m going to process it in a notebook, so I’m not always referring back to my film log spreadsheet. I also take the time before loading the film to mix up my archival wash and pour the stop bath into the cylinder (if I’m using a chemical stop). Before you even start developing at home, I highly recommend getting a couple of throwaway rolls of film both 35mm and 120 and practice loading the film onto your reels before getting into the dark. Loading them first with your eyes open and on the film, remembering the feel and sensation of putting the film onto the reel. Once comfortable, try it again with your eyes closed, doing it by touch and feel. Keep practising until you’re perfectly comfortable. Then practice a couple more times inside the change bag, to be sure.
Loading the Reels
The first step is to get your film onto the reels, this is done in the change bag, and why you practised first. I find it easiest to work with a t-shirt and nitrile gloves on as in the summer it can get humid inside the bag, and if the film gets damp, it will bind when loading onto plastic reels. The gloves also help keep any skin oil and fingerprints off the film. You’ll also need at least the tank and reel in the bag with the film. Along with anything you need to open up the canister and cut the film off the spool. Make sure the film is loaded and the tank is closed and light-tight before removing your arms from the access holes. I’ll let you know; this is probably the more frustrating part of home developing. I have lost more rolls to mis-loads then any other mistake that can happen. Thankfully having eight years of practice has reduced the number of problems. Now the level of frustration can also depend on the film base, with acetate films being among the easiest to load with a thicker base and PET/Polyester being far thinner and being fickle in loading onto plastic reels. One of the worst is Svema Foto 200.
Pre-Soaking
Like stop baths, there is a big divide on whether to pre-soak your film or not to pre-soak. If you’re unsure, take a look at your film’s datasheet and the massive dev chart. I always pre-soak the film as it gives me time to get the developer, stop, and fix prepared. It also helps stabilise the temperature of the film and helps clean off any dust, dirt or debris that might have been introduced onto the emulsion. Plus it helps get rid of any anti-halation layer. Usually, I let the pre-soak take about 1-2 minutes, more if called for in the developing instructions. In the end, the choice is up to you if you choose to or not to pre-soak your film. It’s how I learned how to develop film, so I’m sticking with the pre-soak. Oh and in some cases, you’ll get some colour to the water when you pour it out, don’t worry you haven’t washed off the emulsion.
Developing
Once you’ve poured out the pre-soak water, it’s time to get to the fun part, developing the film! The first step is to pour in the developer, best to do this in one even pour. Doing this is an even manner will prevent any surge marks on the final developed negative. It’s best to use the prescribed amount of chemistry for the tank and fill it up. For my small Patterson tank, I use 500mL of chemistry no matter if I’m developing, one roll of 120/35mm or two rolls of 35mm. Most black & white developing follows a standard agitation pattern, that is you are constantly agitating the tank for the first full minute. Then at each following minute, you agitate for ten seconds, or as I’ve found giving the tank five full inversions. When it comes to agitation, there are two methods, the first and what I find the best is to invert the tank upside down fully, then back right side up. And when you tap the tank to dislodge any bubbles that form as a result. The other method is with the swizzle stick. I don’t use the swizzle stick as it never got results that I liked. But in other cases, a gentler agitation is called for in which case the swizzle stick in the way to go. It’s always best to look at the notes in the film’s datasheet or on Massive Dev chart to see what method is called for. Once the timer on the development is run down to zero, pour out the developer and then pour in the stop bath. Stopping takes about 1-2 minutes of constant agitation. Again the length of time depends on if you’re using a chemical stop or a water stop. If I’m using a chemical stop, I find that one minute is sufficient to stop any developing action. For water, I’ll use the same one-minute time if I’m working with a dilute developer over a long development time (ten minutes or higher), two if it’s a shorter time (less than ten minutes). And often with water, I’ll let the water run into the tank from the tap, starting the one-minute timer once I see the water begins to pour out of the tank. When the timer runs down, I will pour out the stop bath. If I used a chemical stop, I’ll fill the tank with water and give it five full inversions, to clear off any colouration left by the stop bath and dilute it down even more. Next, add in the fixer. Fixer follows the standard agitation pattern with constant for the first minute, then ten seconds each following minute. When it comes to fixing, the amount of time you give your film in the fixer is dependent on the film itself. Most traditional or cubic grain film can be fixed in about five to six minutes. I usually go for five minutes. These films include Ilford HP5+, Kodak Tri-X 400, and Ilford FP4+. Modern T-Grain or Delta Grain film (Kodak TMax 400, Ilford Delta 100) takes longer, I usually give them six to seven minutes, with six minutes being my standard. Once the timer is run out on the fixer, your film is no longer sensitive to light, and you can safely open the tank.
Washing
The final step in the developing process is a wash. The wash can take over ten minutes or under five, depending on the steps and methods you use. My final wash takes about four and a half minutes. If you’re not using any sort of archival wash or hypo clear it’s best to let your film sit under running water for at minimum ten minutes. If you’re concerned about water use and want to reduce the amount of water you use, then it’s best to use an archival wash. The most common option is Kodak Hypo Clearing Agent. With Hypo Clear, let the film sit in the working solution (dilute 1+4 with water) for two minutes. This will reduce your wash time by 50%, meaning you’ll still need to let your film sit under running water for five minutes. An alternate method for washing your film after hypo clear is the Ilford Wash method. Fill the tank, give it five full inversions, dump the water, refill. Then give it ten full inversions, repeat and give it twenty full inversions. Then one more time with forty full inversions. Both options are acceptable, and I used the Hypo Clear and Ilford wash method for years. These days I use the FPP Archival Wash and my wash times have dropped to the four and a half minutes it is today with excellent results and stability. After the fixing stage, I let the film stand under running water for one minute, then let it soak in the archival wash for one minute, then under running water for another two minutes. The final step in the whole washing stage is using rinse aid. I fill the tank then add 1 mL of Kodak Photo-Flo 200, close it up and give it five full inversions then dump it out. After taking the film out of the tank, I will let the film dry for several hours, usually overnight. By using Photo-Flo is helps the film dry clean with few streeks. This is helped by using a squeegee. A warning when working with a squeegee, it is best to wet the rubber blades first, then gently run them down the length of the film. To dry I let them hang in the closet with a wooden cloth peg holding them on the wire shelf and a second one at the bottom as weight. Now, this won’t prevent the dreaded cupping in some films. Cupping is less pronounced in the summer here in Canada and on PET-based films, but Kodak film is among the worst for cupping. To help reduce this and make scanning on the Epson V700 easier, I back roll the film after letting it dry for twelve hours, then let it sit another twelve before scanning. Cupping isn’t too much of an issue with the Coolscan V ED as the auto-feeder automatically flattens the film when it prints the negative into the scanner.
Next Steps – You have your film, now what?
Once you have your negatives, your next step is up to you. There are several options available to you to share your images. One of the more satisfying options is printing your negatives in a darkroom. But this requires a large light-tight room and a lot more time and equipment than the average home developer. So your best option is to digitise your negatives for sharing online or inkjet printing. There are a couple of options, such as using a dedicated film scanner like the Nikon Coolscan V ED or a flatbed scanner like the Epson V700. One option that is becoming more popular these days is using a light table or backlight source and a digital camera with a macro lens to capture your frame. Then using software such as Lightroom and Photoshop along with a dedicated plugin (Negative Lab Pro) or built-in functions to invert the negative images and adjust the levels and curves to get a result your happy with. Now I’m no expert in the scanning side of thing, but I have a workflow that works for me and gets the results that I’m pleased with. But there are many more folks out there who are far better. So I encourage you to explore the Internet and find a workflow that works best for you in the digitisation process. But one thing to consider is the storage of your negatives, that again is a personal choice. I keep all my negatives, even after scanning them into the computer. I do darkroom print so having my negatives available for that is always a good option. The second reason is that I will always have a physical back up of my film images even if the main storage and backup drives die. The negatives are stored in binders in Printfile pages. I also keep a log of everything in a massive Excel spreadsheet.
That about covers the basics, but home developing can be so much more. There are a lot of developers out there, techniques, and film stocks out there to explore. The most important thing is to learn how to do it first, then branch out. And once you’ve branched out, dial in the films, developers, and techniques that get you the results that you like. As long as you’re doing this for yourself, no one can tell you that you’re doing it wrong. Not even me. After some eight years of doing it, I’m still learning and refining my techniques to the point where I can get consistent results with my known film and developer combinations. Of course, if you’ve gotten this far and are overwhelmed, I understand it’s a lot to throw into a single post. And you may even throw up your hands and keep sending your film to the lab. And you know, that’s okay also.