Napoleon had been exiled, to begin with, and the first British reinforcements were starting to arrive on the other side of the Atlantic, bringing with them not only highly trained and effective troops but a steady corps of officers hand-selected by Lord Wellington to take charge and get a great deal of hurt to the Americans. One such officer, Major-General Robert Ross, was dispatched to the Imperial Fortress on Bermuda to coordinate a series of attacks along the eastern seaboard of the United States with Vice-Admiral George Cochrane to distract and pull American resources away from Upper and Lower Canada to respond to the threat. The Americans did see this as a significant threat; Secretary of War John Armstrong created the tenth military district around Washington DC and the surrounding areas of Maryland to create new militia regiments and bring additional resources. This included the grandly named Chesapeake Flotilla, a series of gunboats commanded by Commodore Joshua Barney. President Madison appointed the recently exchanged Brigadier-General William Winder to command the district against the recommendations of Secretary Armstrong. The forces of General Gordon Drummond had backed the Americans into a corner and had them holed up inside Fort Erie. American engineers had not stopped and now had a formidable defensive structure to shelter behind. Drummond, not an officer keen on carrying on a siege, had also been forced to personally take command; Major-General Phineas Riall was a prisoner of the Americans, his replacement, Major-General Henry Conran, had an accident, and Colonel Hercules Scott, had resigned as Brigade commander and reverted to commanding his battalion, the 103rd Regiment. It also did not help that an attempted raid to cut the American supply line on Black Rock on 3 August had failed thanks to the garrison commander who had guessed Drummond’s move and taken steps to prevent any British attack against the naval station.

Nikon D70s – AF Nikkor 85mm 1:1.8D
Commodore Arthur Sinclair’s squadron, having failed to cause any damage in their artillery bombardment of Mackinac Island, had been forced to sail back onto the lake in the face of a storm and heavy fog bank. But they were not going anywhere, and Lieutenant-Colonel Robert McDouall realised they would be forced to conduct an infantry assault on the island. Mackinac Island, the position of the main fort, and the newly built Fort George on the island’s highest point ensured that there was only one spot to launch a successful land assault. The exact spot where Captain Charles Robert had landed when he took the island in 1812. Knowing the route and terrain, McDouall left the locally raised militia to defend the two forts. At the same time, he took his force of Royal Newfoundland Regiment, Michigan Fencibles and Menomee warriors, along with a pair of artillery pieces, into the clearing where any American army would need to pass through to get to the forts. Constructing a series of field fortifications on the rise and pre-sighted the guns. On 4 August, at first light, the American force under Lieutenant-Colonel George Croghan and Major Andrew Holmes began their landings after US Brig Niagara, US Schooner Tigress and US Schooner Scorpion swept the woods with their cannon. The heavily wooded island and rough terrain made the movement of the column slow and difficult. As the first troops moved into the clearing, McDouall’s artillery opened up with a deadly canister, first shredding the American infantry, followed by crisp small-arms fire. Croghan attempted to get the column into line and bring up his artillery, but the ground continued to hamper any meaningful and fast movement. McDouall’s attention would be swayed when a report came of a second American landing, moving his regular troops out of the line; Croghan saw the chance to flank the British position. Sending a detachment of regulars and militia into the woods, the regulars quickly fell to the Menomee. When the militia began to move out of the woods, they found that McDouall had returned to his position, having realised that the report of the second landing had been a false alarm. The American attack faltered as the British and Indigenous troops were methodically cutting them down, and Croghan, facing the death of several officers, including Major Holmes, had no choice but to sound a general retreat back to the boats. The failed attack had cost the infantry dearly, and Sinclair decided to starve out the island garrison while resuming the hunt for HM Schooner Nancy. With the end of the conflict in Europe, public opinion in Canada and England turned against the continued war in North America. The public was not pleased with continued wartime taxes, and the merchants were unhappy that trade with the United States had dropped to nothing. Official treaty negotiations were drawn up and placed in Ghent in the United Netherlands (today Belgium). The American delegation headed by future president John Quincy Adams and four other senior government officials were to meet with Sir James Gambier and three additional members, all minor players in the British government but had close communications with senior members, including Foreign Secretary Robert Stewart, Viscount Castlereagh who was in Austria on another negotiation. The first official meeting would take place on 8 August. The trouble was that neither side could force the other into giving them what they wanted, as the war was still at a relative stalemate.

Rolleiflex 2.8F – Carl Zeiss Planar 80mm 1:2.8 – Kodak TMax 100 @ ASA-100 Kodak D-76 (1+1) 9:30 @ 20C
Graflex Anniversary Speed Graphic – Fuji Fujinon-W 1:5.6/125 (Orange-22) – Efke PL25 @ ASA-25 – PMK Pyro (1+2+100) 7:30 @ 20C
Rolleiflex 2.8F – Carl Zeiss Planar 80mm 1:2.8 – Kodak TMax 100 @ ASA-100 Kodak D-76 (1+1) 9:30 @ 20C
General Drummond faced two significant problems with the siege. He could do little about the lack of artillery; his two artillery batteries were lightly armed for the task, consisting of a pair of 24-pound light cannons and four naval guns at too great a distance to cause any significant harm or reduction of the American defences. They did cause some casualties, but they were rare. The second is that the defenders were well supplied, and the Royal Navy needed a way to get ships big or small onto the lake thanks to a trio of schooners. These schooners could also fire onto his siege lines. Drummond directed Commander Alexander Dobbs to drag six small craft to a safe launching site to capture or destroy the American schooners. Slipping out in the early hours of 12 August, Dobbs, with a detachment of sailors and marines, sailed out in three gunboats. When American sentries spotted them, they boldly lied, stating they were provisioning boats. The ruse worked, and the crews of US Schooner Ohio and US Schooner Sommar were quickly overwhelmed and forced to surrender. But the third American ship, US Schooner Porcupine, cut anchor and drifted away before they could be captured, after briefly sailing into friendly fire slipped away. Dobbs sailed the captured ships to Chippawa, renaming them HM Schooner Saulk and HM Schooner Huron. The capture of the schooners did little to reduce American morale or supplies but did raise the spirits of the British as it allowed the artillery to fire far more consistently. Lieutenant Miller Worsley and Nancy’s surviving crew faced a problem in the north. They needed more support in the region; a force of Indigenous troops had rallied to help them, but they needed a way to get the message out, and the local militia refused to respond to any calls for support. It was completely by chance that on 14 August, a forging party from the American squadron stumbled into the British camp. Unable to stop the alarm from being raised, the squadron quickly bombarded the camp with naval artillery while the crew did their best to reply in kind. Croghan would land a large force and move in by the landward side to quickly overwhelm the defenders, who made the Americans pay. Worsley realised that they had no hope of chasing off the attackers and personally set fire to both the blockhouse and Nancy before escaping into the woods with the survivors. When Sinclair learned of the action, he was pleased and decided to depart the lake aboard Niagara, leaving Tigress and Scorpion behind to keep the British from reestablishing a supply line to the island.

Nikon D300 – AF-S Nikkor 14-24mm 1:2.8G
Rolleiflex 2.8F – Carl Zeiss Planar 80mm 1:2.8 – Kodak Tri-X 400 (400TX) – Kodak Xtol (1+1) 9:00 @ 20C
Nikon D300 – AF-S Nikkor 14-24mm 1:2.8G
General Drummond did not have the time or patience for a long siege; he wanted to quickly and definitively kick the Americans out of Niagara and would do it in the best way he saw. Drummond sat down with several officers to devise a plan for an infantry assault against the fort. By this point, the American defences consisted of the main fort, built primarily of stone with a dry ditch, several artillery bastions with some earthwork, and palisade walls. Engineers had also completed two additional batteries, Douglass Battery near the lake and Snake Hill Battery some distance from the fort. Both were connected to the main fort with an earthwork wall, and the walls were manned with infantry and artillery; Snake Hill mounted six guns alone. Command of the garrison had fallen to Brigadier-General Edmund Gains, who maintained a near-constant state of readiness. Drummond’s plan called for a coordinated three-column attack against Douglass, Snake Hill and the main fort. Drummond called for the attack to take place at night and use most of the infantry he had at his disposal. When presented with the plans, Colonel Hercules Scott and Lieutenant-Colonel William Drummond (the general’s cousin) had severe doubts about the plan’s viability. Both men would send their papers home, but their affairs were in order, with Colonel Drummond gifting his sword to his friend William Dunlop, the assistant surgeon for the 89th Regiment. Drummond’s preparations did not go unnoticed; sharp-eyed American sentries had reported the movement to General Gaines. Despite the heavy late summer rain, Gaines ordered the garrison to stand, too, much to the annoyance of the men. Under the darkness, the three columns set out on 15 August as the rain continued. The column marching against Snake Hill had the furthest to go so their attack would start the assault. Commanded by Lieutenant-Colonel Victor Fischer with volunteers from the Regiment de Wattville and the 8th (King’s), 89th and 100th Regiments marched without flints in their muskets save for a few of the steadiest men. The rain ensured that silence, despite their efforts, was impossible as the wet grass swishing gave them away to an American picket. The defenders quickly fired their muskets before retreating, giving fire to the column. Fischer wasted no time rushing forward; as they cleared the grass, the pre-sited guns opened up against the column with deadly round and canister shots. The rate of fire coming from the artillery and small arms lit up the night like a lighthouse. Those who made it through the hail of gunfire dove into the dry ditch only to find the assault ladders were too short to scale the battery walls. Some men tried to flank the battery by swimming, but the darkness and current swept many to their deaths and others ashore, where the Americans quickly captured them. Fischer was not about to give up and threw the men against the battery five times before the survivors rapidly began to panic and retreated in disorder, taking even the steadiest soldier with them.

Sony a6000 – Sony E PZ 16-50mm 1:3.5-5.6 OSS
Sony a6000 – Sony E PZ 16-50mm 1:3.5-5.6 OSS
Rolleiflex 2.8F – Carl Zeiss Planar 80mm 1:2.8 – Kodak Plus-X Pan (PXP) @ ASA-125 – PMK Pyro (1+2+100) 14:00 @ 21C
After hearing the firing toward Snake Hill, Colonel Scott and the 103rd Regiment began assaulting Douglass Battery. While only facing a few American guns, the entire regiment had been jammed into a narrow front, making the canister shot from the battery deadly against the massed troops. Caught between an embankment and the lake, he had no choice but to push his men forward. Charging in and giving fire when they could, the American defenders quickly knocked the men down, including Scott and his second-in-command, who were quickly pulled back to the rear. Caught in the ditch, one soldier called out that the Americans were shooting fellow troops. The firing died down briefly, but the act was not convincing enough, and the defenders shouted back to go to hell and resumed firing. The survivors did their best to stand up and try and storm the battery, but the bloodletting was too much, and the survivors retreated in disorder. Colonel Drummond’s column had been charged with taking the main fort and used its dry ditch to conceal their movement, this time with success. Waiting out of sight, they heard the sound from Snake Hill and saw the fort’s defenders turn their attention to Scott’s attack, so they took the chance and charged. Colonel Drummond led the charge armed with a naval boarding pike with a column of Royal Marines; 41st and 104th (New Brunswick) regiments clamoured into the fort’s northeast bastion. Drummond gave the order to give no quarter to the enemy, and the surprised American gunners were quickly overwhelmed and bayonetted by the British. Gunners moved to turn the heavy American gun around to point it into the fort, where reinforcements were quickly regrouping and pouring fire into the bastion. Drummond, again taking the lead, tried to break his men out of the kill zone; accounts show him screaming like a demon as American musket fire cut him down. The Americans also managed to turn one of their guns inward, but the British were first to fire, knocking the second gun off its carriage. General Drummond, noticing the success, deployed reinforcements from his reserve, sending two companies forward from the 1st (Royal Scots) Regiment, which the survivors of the 103rd joined. The attackers were quick to switch to canister holding back the Americans inside the fort, at least until a careless spark fell into the magazine below. The bastion exploded, sending rocks, shots, men, stones, debris and cannons flying in every direction. The defenders sheltered inside the stone blockhouses were protected, but those inside the bastion were vapourised, and those without were killed without mercy or wounded. Those who escaped were either captured or made it back to camp with whatever wounded they could rescue. The British surgeons worked for three days as the injured lay in the mud and squalor; battalions were reduced in strength, some by as much as two-thirds, with the 8th (King’s), 103rd and 104th (New Brunswick) regiments taking the most losses. The men openly wept as the rolls were read the following day.

Nikon D300 – AF-S Nikkor 70-200mm 1:2.8G
Nikon D70s – AF Nikkor 85mm 1:1.8D
Nikon D300 – AF-S Nikkor 70-200mm 1:2.8G
The raids against the eastern seaboard of the United States had given the Americans pause, but nothing that could both aid the ongoing negotiations in Ghent and make the Americans think twice about continuing the war in the Canadas. General Ross and Admiral Cochrane believed an attack against a major American port city would be what was needed and saw Baltimore as the easier target. Rear-Admiral George Cockburn however had been leading many of the Royal Navy’s efforts against the east coast had a better idea in mind, attack the American capital, Washington DC. The squadron would sail and setup an armed camp on Tangier Island to act as a fall back and supply depot but also a recruiting post. The British were more than willing to provide freedom to many enslaved persons in return for service in the Colonial Marines. General Winder faced growing problems, while he had a large force on paper the militia in the region were poorly equipped and poorly trained. It did not help that he had no staff and despite touring the area did nothing to shore up any defenses. While he insisted to call up the militia, Secretary Armstrong felt that it would only alert the British. Admiral Cockburn had been perusing the Chesapeake Flotilla and the two forces had been nipping at each other. This move kept the flotilla occupied while Admiral Cochrane sent three smaller squadrons inland to divide the American attention and then successfully raided Alexandria, Virginia. While Cockburn would force Barney to scuttle his flotilla rather than see it captured by the British and took his force of sailors and Marines to aid in the defense of the area. Ross would land his army at Benedict, Maryland on 19 August and General Winder would sound the alarm. Any group that could respond did, and Winder found himself in command of a mixed force of artillery, infantry and cavalry. But Winder still did not know what Ross’ end-game was, on the route he was on could take both Baltimore or Washington DC, but the key cross-road was Bladensburg, Maryland. Winder would order Brigadier-General Tobias Stainsburry to march on the town and form a defense while he would engage the British. But Ross continued to keep Winder guessing as he marched forward, eventually the two would meet at Upper Upper Marlborough and Winder was forced to retreat. He sent word ahead to General Stainsburry who rather than stay in his superior defensive position retreated across the river and failed to destroy the bridge out of fear that his flank could be turned. While the new spot still worked, it lacked the ability to dominate the British whatever approach they arrived. Winder would fall back to Bladensburg and join the defense along with Commodore Barney who set his Marines and Sailors up with additional artillery at a high point on the defensive line. On 24 August, the lead elements of Ross’ army arrived on the field, the light brigade lead by Colonel William Thorton with the Colonial Marines, 85th (Buck’s Volunteers) and the light companies of additional regiments came onto the field. Charging the bridge, the first shots rang out, round shot crashed through the columns while riflemen picked off targets. The defenders continued to hold the British back until Colonel Thorton redeployed into skirmishing order and lacking canister shot the spread out body of troops was hard to hit with conventional shots. With the intial defenders pushed back, the main body of troop began to march up crossing the bridge and fording the river. The Americans again poured on fire, making the British fight for ground. But the steady vetrin troops pushed forward and then released their surprise as barrages of rockets poured overhead. While inaccurate, the scream of the rockets caused the ill-trained and ill-lead militia troops to cut and run. As the British moved up and onto the flanks, General Winder tried to regroup the troops but the retreat became general. In the chaos, the message to fall back and defend Washington did not reach Commodore Barney. The Marines were not going to give up so easily, standing up to the constant attack by the British troops and even managed to launch a counter-assault screaming ‘board them’ as a battle cry. It only took the combined effort of the 4th (King’s Own) and 44th (East Essex) Regiments that turned the flank of the Marines and forced their surrender.

Hasselblad 500c – Carl Zeiss Planar 80mm 1:2.8 – Kodak TMax 100 (TMX) @ ASA-100 – Blazinal (1+25) 6:00 @ 20C
Sony a6000 – Sony E PZ 16-50mm 1:3.5-5.6 OSS
Hasselblad 500c – Carl Zeiss Planar 80mm 1:2.8 – Kodak TMax 100 (TMX) @ ASA-100 – Blazinal (1+25) 6:00 @ 20C
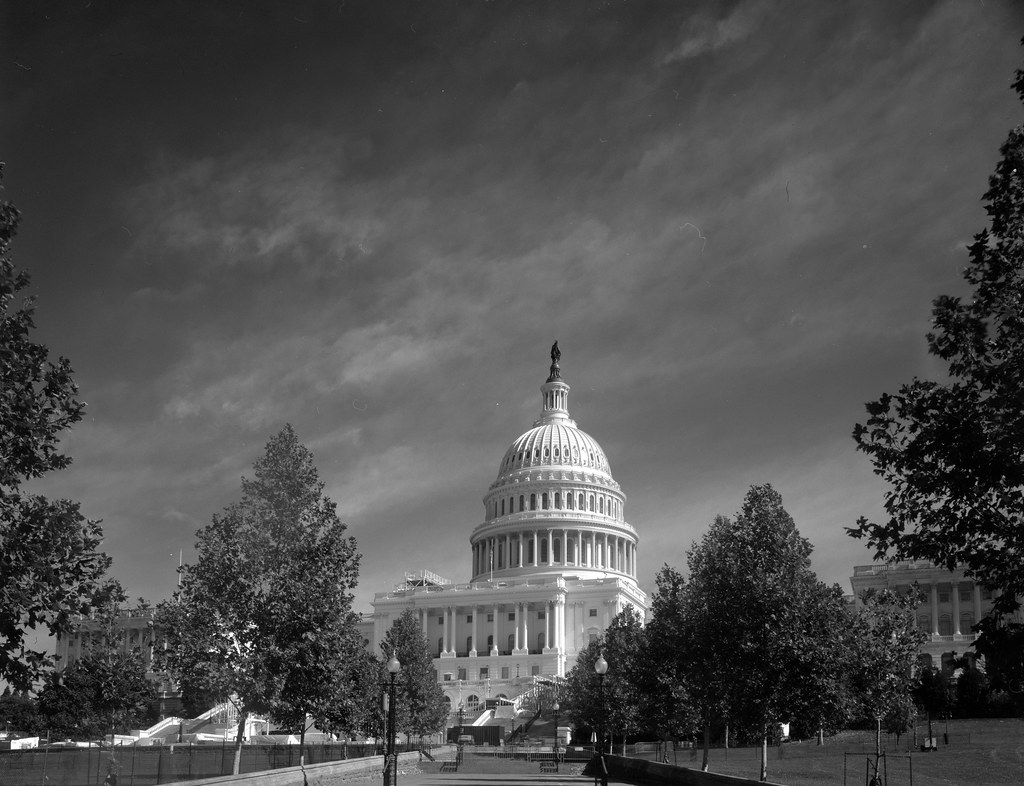
Before the British reached Bladensburg, the American capital was already panicking. The government had gathered whatever documents they could, and the employees fled the city. President James Madison had taken shelter at a friend’s home in Brookeville, Maryland, and the Senate and Congress had also left. Dolly Madison, who was still in Washington, had been warned to get out by her husband and directed the household staff to save whatever they could, along with a painting of George Washington and silverware, before fleeing. No cart, carriage or wagon could be found, and many citizens were also fleeing. The troops stationed at the Washington Navy Yard were hurriedly stripping the magazines and either carrying the supplies off or hiding them. At the same time, they prepared to do the worst and destroy the yard and the ships under construction. General Winder and Secretary Armstrong hoped to regroup the survivors into an organised final defence of the city. They could only watch in horror as the survivors did not stop in Washington but kept running to protect their homes and property. Ross’ army did not stop at Bladensburg but kept marching, entering the city late on 24 August under a flag of truce. General Ross hoped to secure a formal surrender, but after shots were fired at the officers under the flag, the gloves came off. Admiral Cockburn would have seen the whole city, but General Ross directed that only public buildings would be destroyed. The US Capitol was a far cry from what it is today; the most significant building on the skyline was the US Capitol. British troops charged in, sacking the building, tearing down anything that could burn chairs, tables, podiums and the entirety of the Library of Congress, piling it all in the centre of the rotunda and setting it ablaze. British troops then repeated the process at the Executive mansion, eating a meal before setting the interior ablaze. The US Treasury, War Department and other government buildings were set ablaze, but the Patient Office was spared. Admiral Cockburn personally oversaw the brick-by-brick demolition of the National Intelligencer newspaper office. This paper gave him all sorts of rude nicknames for the trouble he caused on the East Coast and ensured that all the C’s in the type blocks were melted down. While private property had been ignored, the fires soon spread, and the city seemed to blaze long into the night. American sailors set the navy yard ablaze and destroyed US Frigate Argus and US Frigate Columbia. British troops hoping to capture some of the supplies blew themselves up accidentally with some hastily hidden powder at Greenleaf Point. The fires continued to burn the following day. Twenty-four hours later, a hurricane swept in, spawning torrential downpours and tornados that swept through the city, destroying property and putting out the fires. Having no desire to secure and occupy the capital, Ross ordered his army back to the ships and left the city in ashes.
Graflex Crown Graphic – Fuji Fujinon-W 1:5.6/125 (Orange-22) – Adox CHS100II @ ASA-100 – Blazinal (1+25) 5:00 @ 20C
Hasselblad 500c – Carl Zeiss Planar 80mm 1:2.8 – Kodak TMax 100 @ ASA-100 – Blazinal (1+25) 6:00 @ 20C

Graflex Crown Graphic – Fuji Fujinon-W 1:5.6/125 – Adox CHS100II @ ASA-100 – Blazinal (1+25) 5:00 @ 20C
Lieutenant Worsley and his crew successfully avoided capture by the American schooners, reaching Mackinac Island on 31 August. The garrison was in a hard place; the troops were on half-rations, and Colonel McDouall had been forced to slaughter horses to provide meat. He would grant Worsley permission to seek out and capture the American ships and provide him with troops from the Royal Newfoundland Regiment and Ojibwa warriors who arrived on the island. President Madison and the military returned to Washington on 1 September and called for all able-bodied citizens to defend the region. Anyone willing to volunteer was mustered and marched out towards Baltimore, where the British were sure to go next. Worsley wasted no time hunting down the schooners from a base on Drummond Island, spotting the Tigress on 2 September. Approaching in the early hours, the watchmen failed to notice the attackers before it was too late, and when they fired, they missed. Taking the chance, the British clamoured aboard the short fight and saw the crew surrender with only a handful of casualties. Leaving the American prisoners on Drummond Island and the American flags flying, the captured schooner quickly located Scorpion. With the redcoats hidden under greatcoats, they moved close and saw the American sailors doing their daily tasks. Worsley sent a round into the schooner with the ship’s cannon, followed up by small arms fire, and the crew again quickly surrendered. Worsley would send word of the state of Mackinac Island and his capture of the two American schooners before setting out to Penetanguishene. The ships were repaired and returned to service as HM Schooner Surprise and HM Schooner Confiance, and an ample supply cache was brought back to the island. World leaders widely condemned the destruction of Washington DC by the British; the destruction of a nation’s capital was not done. Even Napoleon did not destroy Berlin during his wars, and the Allied forces left Paris occupied but intact. The British destruction of Washington was nothing more than much-needed revenge for American actions against Niagara, York, and Port Dover at the request of General Prevost and something Ross, Cochrane and Cockburn were more than happy to do. With more British reinforcements arriving, General Prevost would reluctantly send the 6th and 82nd Regiments to General Drummond along with siege guns while he planned his invasion of upstate New York. The army of General Ross contained no troops from the Canadian militia or fencible regiments or any regular British regiment that had served in the Canadas.

Rolleiflex 2.8F – Carl Zeiss Planar 80mm 1:2.8 – Kodak Tri-X 400 (400TX) – Kodak Xtol (1+1) 9:00 @ 20C
Rolleiflex 2.8F – Carl Zeiss Planar 80mm 1:2.8 – Kodak Tri-X 400 (400TX) – Kodak Xtol (1+1) 9:00 @ 20C
Nikon D300 – AF-S Nikkor 14-24mm 1:2.8G
Today, there is still plenty to see and interact with from this part of the war, and they are all well worth visiting. Mackinac Island has been mentioned before and is well worth a visit. You can visit the restored Fort George, renamed Fort Holmes when the Americans took control of the island in 1815 and named for Andrew Holmes. The original battlefield is now the Wawashkamo Golf Club, and some plaques and memorials are accessible without having to go onto the course itself. The Canadian Government rebuilt Old Fort Erie in the 1930s as part of a make-work project to restore several colonial forts nationwide. Rebuilt to how the main fort would have appeared in 1814, it features several historic plaques, including one to capture Ohio and Sommars and a memorial to the British casualties during the night assault that today sits atop a mass grave. The entire fort got a significant update in 2012, including a massive new visitor’s centre and museum and examples of a British siege battery. The fort hosts one of the oldest 1812 reenactments in August that retells the history of the siege, including a night assault that is well worth visiting. The hulk of Nancy was discovered in 1928 and buried on the aptly named Nancy Island in Wasaga Beach, Ontario. It is now housed in a museum. Combined with Discovery Harbour in Penetanguishene, Ontario, it is housed in the old Royal Navy Station; it tells the tale of the war on Lake Huron. The original battlefield in Bladensburg has changed significantly in the two centuries since the battle took place, but there are still memorials. The latest addition to Commodore Barney and the Marines can be found in Bladensburg Balloon Park Historic Site at Bladensburg Road and Baltimore Avenue. A second memorial to the Marines is found at the high point in the Fort Lincoln Cemetery, which also includes a series of earthworks that date more to the American Civil War. You can also see plaques and markers throughout the Bladensburg Waterfront Park. The Madison House in Brookeville, Maryland, also still stands and can be seen from the street and looks close to how it appeared in 1814. If you visit and ask for directions, you may meet the owners, who are friendly towards history nerds who ask nicely. However, note that it is a private residence, so keep that in mind when visiting. In Washington DC, no plaques indicate the city’s destruction and many buildings have been rebuilt since the war. But two still stand: the White House and the US Capitol. Although both have seen many changes since 1814, they are still built on the bones of the original buildings. Near the White House stands the Octagon House, where President Madison stayed throughout the rest of the war, and is a museum that is open to the public. You can find plaques to the capture of Tigress and Scorpion, the first marking where Worsley and his crew departed in Pentanguishene, Ontario and a second to the capture is found in Thessalon, Ontario, near Thessalon Lakeside Park Campground on Highway 17B.
Great images and camera collection Alex!