The idea of a small light meter is nothing new, ever since the concept of an exposure meter that clip onto the camera through an accessory shoe (or hot shoe). When I was shooting a Barnack Leica, I used one such meter, the Voigtlander VCII. A fantastic meter, easy to use, a little restrictive at times, but never missed a beat. I don’t recall what happened to mine. It either stopped working or got lost on an adventure on in my one move. When my good friend and regular of the Toronto Film Shooters Meetup, Matt Bechberger, let me know he aimed to release his tiny lightmeter I thought that this would be an excellent addition to my toolkit. Little did I know that he would be one among many and fellow Alliance member, Johnny Martyr, wrote a whole piece outlining the recent group and some classic shoe-mounted meters. I jumped all of the Kickstarter campaigns, and while I missed the early bird, I still snagged one for the initial price. Thankfully, Matt launched his campaign in a lull between photographic crowdfunding campaigns. That meant he didn’t suffer from crowdfunding fatigue; the result was a wild success. And getting mine in the mail proved a welcome piece of joy during strange times I took mine out the day after it arrived.
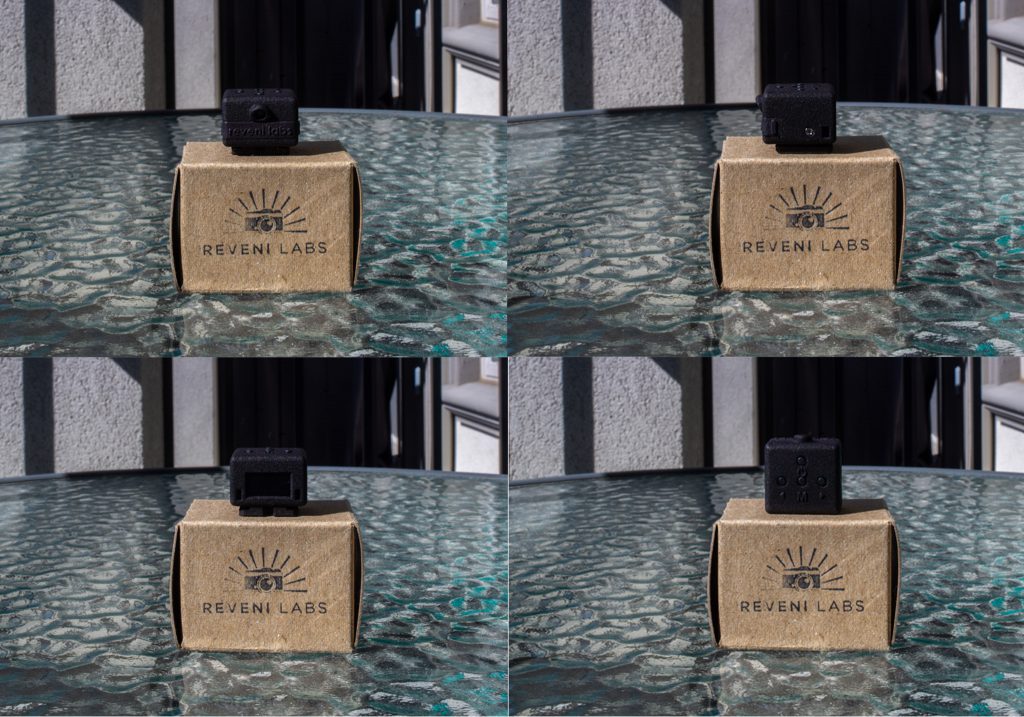
Probably the best part about the LM-1 is how nice it looks. Honestly, for a device this small, it certainly looks like something produced by a high-end company, not a recent startup. And between the prototypes and the production unit I received, the fit and finish were undoubtedly improved. It just looks good, everything is clean, the edges are nicely rounded, and there is just enough texture to break up the uniformity. The best part is that due to the size you often will miss the device when you pair it on a larger camera. Even on my Mamiya m645 the device gets lost, although it is slightly more prominent on something like an Olympus OM-1n or Nikkormat FTn. And yes, I did stick it on my Crown Graphic, and it works, but it super tiny against the body of a press camera. But don’t let the size fool you, the buttons while small are well spaced apart, and it’s hard to press the ‘wrong button’ by accident. And the OLED display is bright, even in direct sunlight, the display is crisp and clear.


As a meter, the LM-1 is surprisingly easy to operate, with only a cluster of four buttons that are well laid out and clearly labelled. The power button that acts as the sampling button, two arrow buttons that help adjust settings, and then the “M” button to access the menu. I don’t recommend using the LM-1 at night or in a dark situation if you are new to the device, but after a good month, I can use the meter without looking, simple memory of button placement. The OLED screen, as I mentioned in my previous paragraph, makes the meter easy to use even in direct sunlight. You can set the meter in two settings, aperture priority or shutter priority through the menu; you can also adjust the ISO. Plus there are plenty of other settings including EV adjustments, Calibration, Time-Out and Mode. No matter which mode you set the meter to you can use it as a base point; I know that I’ve done different settings based on what the meter has said (If I don’t want to adjust my shutter speed, I know I can just change the aperture a stop to get the same exposure). The meter will also prove you with an EV reading before the aperture/shutter speed display that again can help with setting cameras that have EV numbers on the shutter control (Hasselblad, Hi-Matic, etc.). There is a slight delay from pressing the button to the change registering on the screen, but nothing too long as to annoy. Plus having that time-out function helps extend battery life, and as soon as you power it on each time, you capture your meter reading. And Matt has built-in a wide range of apertures, shutter speeds, and even film speeds. Making this an excellent meter for speciality functions. I’m thinking cameras that have meters that stop at ASA-6 or ASA-3, and you want to shoot ASA-1, or pinhole metering you have ultra-small aperture settings. Even large format shooters who wish to shoot their press-cameras handheld and want a meter that will work. I know that my Crown Graphic has an accessory shoe that will make mounting the LM-1 easy. There is one setting that I do recommend leaving be, and that’s the calibration setting, I made the mistake of setting that to 0 (from 3), and while it didn’t ruin the film, I noticed it proved far better when I put it back to three.


When it comes to metering with the LM-1 opposed to a Gossen Lunasix F (both of which work on the same principles), there is little difference between the exposure data I get from the meters. The LM-1 is a reflective meter and a reflective meter only, so it meters the light coming from the subject. It is not a precision instrument, and I know that in some cases, I did lose the shadows in some scenes. Now I did only test the meter with black & white film due to the ongoing situation, and I wanted a fast turn-around on the images. Personally, I would trust this meter with any film stock, black and white, colour negative, and even slide film. Also, I did try the meter in several lighting conditions, mainly in bright direct sunlight where it performed well, but even in the shade and open shade, it performed with excellent accuracy. The one thing I will say is that you do need to be careful where you point the meter, you might not get what you want. I should have in one of the images I shot opened up the aperture a bit to get that shadow detail. One thing to watch out for is a reflective surface, the way the meter is based it might pick up on light reflecting off the surface of the camera top plate. Thankfully the black surface on the m645 and taller shoe of the OM-1n didn’t result in conflicting light reflections.


Honestly, I didn’t realise how many similar meters like the LM-1 are on the market today. And while some are less-expensive, they are a bit bigger and produced by people who I don’t know personally. Matt is a good guy, a mad scientist and inventor. But he is a friend and fellow photographer. I find the LM-1 an excellent addition to my toolkit, something that I can throw on the m645 or OM-1n when I want to use a meter but don’t want to add anything extra to the kit, especially on the small size of the OM-1n which adds little to the height or weight to the camera. Now the cost might be prohibitive to some, with the meter clocking in at 125$ Canadian (90$ USD), but honestly, it is worth every nickel. If you’re looking to purchase the meter, head over to reveni-labs.com.
Is this review too long? Why not check out my video review on the Reveni Labs LM-1 meter.
1 Comment