When it comes to metering for precision, there is nothing better than a spot meter, but most spot meters these days are expensive, both new and on the used market. The first and only spot meter I’ve used is the Pentax Spotmeter V. This analogue 1° spot meter has become the accessory that always gets thrown in my bag when I’m out with my Crown Graphic Hasselblad or Mamiya for precision tripod-based work. The meter served me through almost my entire War of 1812 project, Canadian Confederation and most recently, the Railway project. A simple easy to use device that allowed me to execute a bit of Zone System work. But there is one downside to the Spotmeter V, it takes up a lot of room in the camera bag and isn’t easily pocketable. Enter Reveni Labs, after their successful hot shoe based lightmeter, Matt cooked up his next entry, a compact spot meter and he certainly hit the spot with this beauty.
Overview
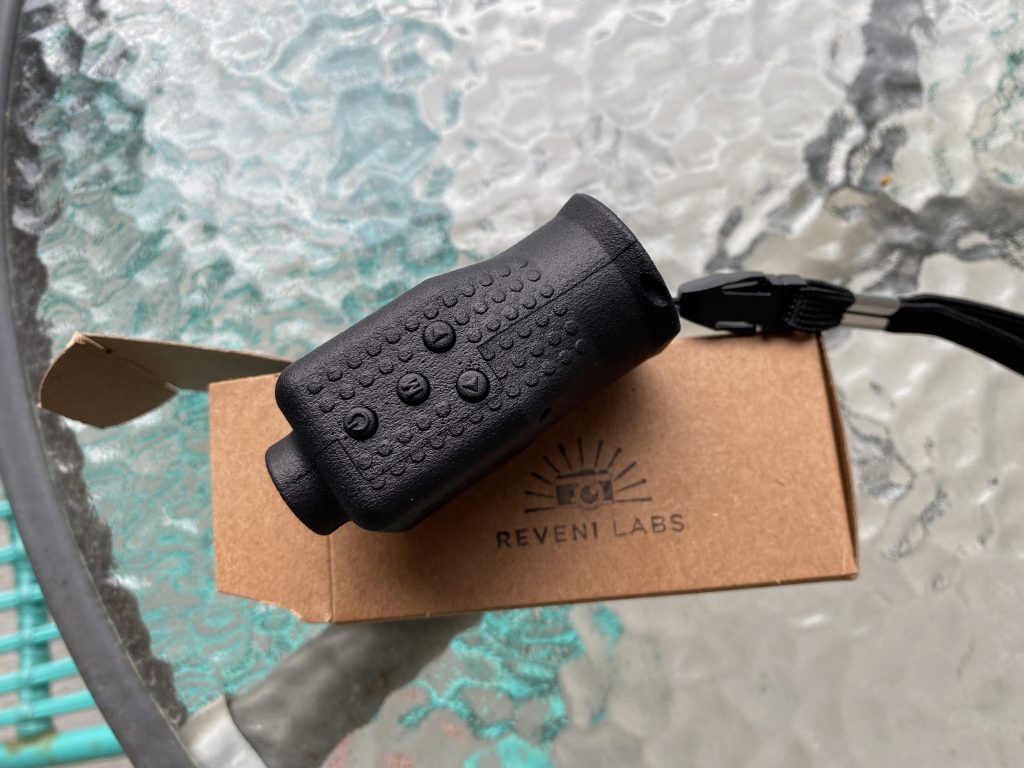
Moving from the Pentax Spotmeter V to the ReveniLabs Spotmeter is a bit of a jarring experience; first and foremost, this is a small unit that can easily fit in any camera bag and not take up much space. Matt also includes a neck lanyard making it easy to carry around and work in the field. Compared to the Spotmeter V, it is about the length and depth of the handle and has way more functionality. The unit is based around the same type of sensor as the original Reveni Labs meter but cowled to allow for the desirable 1.5° circle that so many precision metering applications require. The meter is powered by a pair of LR44 batteries, and Matt even included a micro USB port to allow for easy update of the meter’s firmware. The meter’s display is based on the same bright OLED screen but is housed behind a sighting lens (more on that later) but has a great deal of information, including a target reticle, meter status, aperture, shutter speed, EV, and ISO displayed right there. Apertures cover everything from f/0.7 to f/1024 (perfect for pinhole), shutter speeds from 60 minutes to 1/8000th of a second and ISO ranges from 1 to 12800. But where the meter shines is the four different operational modes, there is your standard single reading mode (the mode I use the most), you can also do a two-point averaging mode picking the highlight and shadow, and the meter will automatically calculate the average EV and display the appropriate exposure times. And while these two options can handle about 80% of your work, there’s much more to the meter. Matt worked hard with tons of amazing photographers to include a Zone System Method, where you can pick and assign a metering reading, say a grey card can be put into Zone V or a white surface into Zone X. The meter can then compute that Zone V value and display it. And if you’re a fan of Nick Carver’s Precision Metering Method, that’s in there also and works the same way as the Zone System mode allowing you to meter and assign a value and then calculate it out. And Matt worked directly with Nick to ensure that the system was accurate and correct.


Build Quality
Continuing to take advantage of 3D printing, the spot meter features a well-constructed exterior shell that follows a similar style to the original hot shoe meter in a matte black finish. Despite a rugged appearance, this is not the best choice for harsh conditions. You do not want to be taking this thing out in the rain as it is far from waterproof or shockproof. Any exposure to moisture will damage the internal electronics, and any significant drop will damage the meter or knock something out of alignment. That said, the meter is lightweight and takes up only a little space in any camera bag. The fluted design makes it comfortable to hold in your hand when metering. The OLED screen is big and bright for a meter this size, and it appears so for two reasons. The first is that the screen is behind the sighting lens, the second is that during the use of the meter, you hold it up to one eye and sight with the other superimposing the meter’s readout over the scene. But probably the best improvement over the original hot shoe meter is that Matt has more real estate. The function buttons are much larger and easier to use and press, no need to aim with a fingernail. You can use your whole finger and not risk pressing the wrong button. The buttons are also well laid out and provide excellent feedback. With a good deal of in-field practice, I can operate the meter without having to look where I’m pressing.


Operations
If you have worked with the first Reveni Labs meter, then working with the spot meter will be a walk in the park. Despite the radical differences between the two, operationally, they follow a similar user interface and have a similar user experience. The primary controls are focused on a four-button array at the top of the meter, with a power/reading button, menu button and two control arrows. These are much larger than the previous meter and are readily manipulated with bare fingers as they are spaced better. The display is much more prominent thanks to the OLED screen and viewing lens and the capacity to superimpose itself over the scene is an excellent take on the traditional spot meter scope style interface. Your screen will display everything you need, from shutter speed, aperture, EV, mode, and targeting recital. Press the ‘M’ or menu button to access the different ways, then use the arrow keys to adjust the settings and modes. You can choose to run the meter in either shutter or aperture priority modes. In single mode, you can pick a single area to take a meter reading from or use the “M” button set to compare mode, and the meter will constantly be reading the scene as you change your target. Similarly, in compare mode, you can pick a highlight and shadow. The meter will calculate the average reading between the two, which is excellent for shooting slide film or wanting that five-stop difference for the zone system. But you don’t have to work that way; you can use the meter’s built-in Zone Mode, which will allow you to choose the zone, so if you have a grey card or something in your scene equal to middle grey select the zone and take a meter reading and the software will do the rest. But you can also pick any of the other zones to take metering from, and the software can calculate out from there. If you’re a student of Nick Carver’s Precision Metering Method, set the meter into PMM Mode and then you can meter for each of the different scenes in the Precision Metering Method let the software do the rest. While the first two modes let you handle things mostly yourself, the second two modes will make life so much easier for those who want an easy way to crack into advanced methods of metering.


Experience
One of the strongest features of this meter is the size; it’s compact, lightweight and can fit in almost any bag you have available to you! You can also wear it around your neck, and it stays out of the way, making it accessible for precision metering if you have your camera on a tripod or handheld. I know I love having the capability to use the Zone System without having the camera plopped down on a tripod. Especially when working with either my Mamiya m645 and Hasselblad 500c while on the road. The one thing that I noticed with the meter is the length of time it takes to boot up, mainly because there’s a lot of information in the boot sequence. Despite all that power and ease of use of high-end metering methods and modes, the spot meter is a fair-weather meter. You don’t want to take this meter out in any inclement weather, including rain, snow, and cold weather. It has no form of weather sealing, and any moisture will cause the meter to malfunction or cease to function altogether. And the cold weather will shorten the battery life. The meter does take a pair of easily purchased LR44 batteries, which carry a decent life for the meter, providing you aren’t running it for long periods; in ideal conditions, I managed to shoot ten rolls of film with the meter before needing to replace the batteries. While I haven’t needed to update the meter’s software, a simple micro USB plug will connect the meter to any personal computer which detects the meter as an external storage device. It works on both a Windows 10 machine and macOS running on an Apple MacBook running an Intel processor. I have not yet tested the functionality on Windows 11 or the new M1 Apple machines.


Lowdown
Spot meters are not for everyone, but if you’re looking for something compact and allows for easy access to some of the more advanced metering techniques, then the Reveni Labs spot meter is undoubtedly an excellent place to start. While you will still need to understand, it certainly can help kickstart that in a practical means rather than theoretical only. And I know if I can learn something useful, it sticks much easier than any academic book learning. The meter costs 225$ Canadian, which is about on par for a used Sekonic, well below a new spot meter. If you want to purchase one, they are available for pre-order as Mat is still working on catching up with the Kickstarter rewards; you can put in your order through the ReveniLabs Website. While I still keep my Pentax Spotmeter V around, I know I have a strong replacement ready for when it finally kicks the bucket. It may also kick me in the pants to start working more with the Zone System and Precision Metering Method.
Further Reading
Check out these other reviews of the Reveni Labs Spotmeter.
Mat Marrash – Reveni Labs Spotmeter Review
Todd Korol – Reveni Labs Spotmeter Review
Nick Carver – Reveni Labs Spotmeter Review
1 Comment